Skip to content
  • Our Company
  • FAQ
  • Support
  • Log In
Interview Magic Logo
  • Our Solutions
    • Companies
    • Applicants
  • Contact Us
Watch a Demo
Watch a Demo
×
  • Contact Us
  • Our Company
  • Our Solutions
  • Support
  • Log In
Interview Magic Logo

   HOW TO ADD A BRANCH

Back to Support Page

Companies

  • How to Add a Company

  • How to Edit a Company's Status

  • How to Add a Branch

  • How to Edit a Branch's Status

  • How to Add a Work Site

  • How to Edit a Work Site's Status

  • How to Add a Contact

  • How to Edit a Contact's Status

Positions

  • How to Add a Position

  • How to Edit a Position

  • How to Edit Position Status

Skills

  • Adding a Skill to a Position

Applicants

  • How to View an Applicant

Watch A Video Explaining Branches

Watch A Quick How-To Video On Adding Branches

Step 1

From your dashboard, you can click on “Companies” in the boxes across the top, or “Companies” in the left-hand menu.

Picture1

Step 2

From the Companies page, simply click on the company you need to edit.

Picture1

Step 3

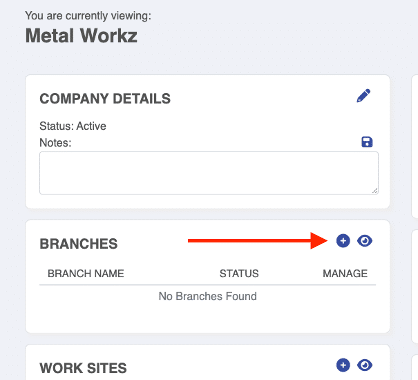
From the Company Detail page, click on the “+” in the Branches Section.
Picture1

Step 4

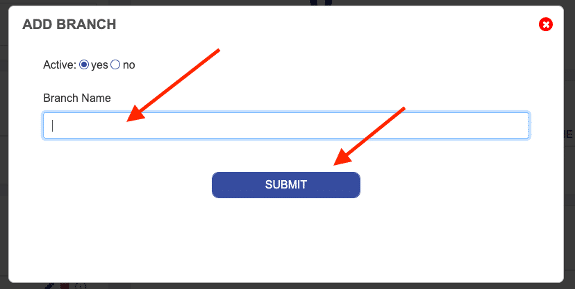
Add the Branch Name and click “Submit.”
Picture1
Interview Magic logomark

Quick Links

  • News
  • Product Roadmap
  • Support

Our Policies

  • Privacy Policy
  • Cookies Policy
  • Terms Of Use
  • Mobile Messaging Terms and Conditions

© 2025 Interview Magic. All Rights Reserved.